by Andy Gricevich, Newsletter Writer
 It’s the season of ripening—the time when food from gardens, farms and forests drenches us in abundance. Farmers head into their busiest months, racing daily to keep up with the harvest. Traditionally, all human communities, at least in climates with a real winter, have put in a huge amount of work during the high summer to preserve as much food as possible for the months when growth ceases, except for the slow penetration of roots through the frozen ground.
The most locked-down phases of the pandemic saw a huge resurgence of interest in many traditional skills, practices and pastimes, and canning was certainly among them—to the extent that last year it became nearly impossible to find jars (in conjunction with reduced workforces in all areas of manufacturing). This year the jars are back, and the renewed enthusiasm for connecting with the seasonality of food through preservation persists. If you, too, have become can-curious, it’s time to get busy!
CAN YOU CAN?
Nearly anything can be preserved through canning of one form or another (exceptions include grains, dairy, and a short list of vegetables). The technique you use depends on food safety considerations and on the desired end product. When it comes to safety, the main concern is potential contamination with the toxins produced by the C. botulinum bacterium—the little critter responsible for botulism. These bacteria are all over the place, but cases of poisoning are actually very rare. They only tend to produce their potentially lethal toxins under certain conditions—all of which are, indeed, present in improperly canned food.
Safe canning involves a combination of heating foods to temperatures that will kill C. botulinum (and other microorganisms) and/or making sure the food is sufficiently acidic, salty, and/or sweet to discourage their production of toxic spores. All the details you need about every aspect of safe canning can be found in the USDA’s Home Canning Guide (available online or in print). Following their guidelines should easily ensure a safe product.
The canning technique you employ will depend on the raw food you’re preserving and what, if anything, you want to turn it into. Some foods require one technique for maximum safety and flavor, some another. The most basic categories are hot water bath canning, pressure canning, and fermentation.
THE HOT BATH
Hot water bath canning is probably the most familiar preservation technique to most of us. It’s the way most people can tomatoes, jams, and pickled vegetables, for example. It’s safe and effective for what the food industry calls “high-acid foods,” which don’t necessarily taste particularly sour, but have a rating below 4.6 on the pH scale. pH is a measurement system that runs from extremely acidic (on the low end) to extremely alkaline (on the high end). You can buy pH test strips or meters, but most people will simply check the USDA guide for which foods qualify as high-acid, when it’s not obvious.
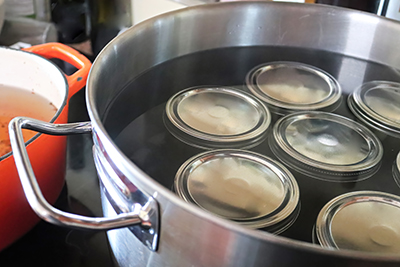
In this technique, food is poured or packed into clean canning jars (the ones with the two-piece, screw-on lids), which are then fully submerged in boiling water for as long as the recipe calls for (if the water cools below boiling, the timer gets reset). It’s done in a canning pot, which features a rack that keeps the jars from resting directly on the bottom of the pan. Usually (though not always) the jars are given a ten-minute bath in boiling water to sterilize them before they’re packed, and most of the time the food goes in hot, or—in the case of pickles—is covered with very hot pickling liquid just before the jars get sealed. After boiling, the jars are removed with specialized canning tongs and set aside to cool, generally overnight. The heating and cooling process produces a vacuum inside the jar that will keep your food from going bad—just check to make sure the lid doesn’t pop up if you gently press it once it’s cooled. If it does, you can screw on a new lid and boil it again. The gentle pinging sound of lids being sucked down to make a tight seal is one of the small satisfactions of canning.
The bacteria we want to keep out of our canned goods don’t like acid, so it’s effective to hold them at the boiling point of water (212ºF) for long enough to heat them through and kill any microorganisms that might be present on the surface of our fruits and veggies. Nutritionally, it’s best to can food as soon as possible after harvest; though the boiling process reduces some vitamin content, it turns out that promptly canned food is nutritionally comparable, or even superior, to produce that’s been stored for as little as a week or two under refrigeration.
That said, hot water bath canning is a great way to put up large quantities of food you can find at your Co-op’s Produce department. Big batches of plums, apples, or berries can make for excellent jams, jellies, syrups, or pie fillings, while there’s a huge array of vegetables that make fabulous pickles, to be opened as a bright side dish, snack, or addition to a charcuterie plate during the winter months (or anytime). Tomatoes are also often a good bet for hot water bath canning (though some aren’t acidic enough—you need to check the guidelines on this one).
PRESSURE
Unless they’re pickled, most vegetables aren’t acidic enough to ensure a safe product when processed at the boiling temperatures of the water bath. That’s where the pressure canner comes in. Without going too deeply into the physics of it, pressure canners (not the same as pressure cookers!) create a vacuum, increasing air pressure by filling the pot with steam. The increased pressure raises the boiling point of water, so the food in your jars can reach temperatures of at least 240ºF—hot enough to kill off the toxic spores of botulism bacteria.
In pressure canning, the jars aren’t covered with water—it only takes a few inches to produce sufficient steam—and don’t need to be sterilized first, since the high temperatures inside the pot will do the job perfectly well. Your canner’s instructions and your recipe will tell you how much pressure you need to maintain, and for how long; the pressure is determined by the heat of the stove’s burner, and the pressure gauge on the canner will tell you how high it is. Recipes usually also include adjustments for altitude, since elevation affects the relation of pressure to temperature (more physics we won’t go into in detail).
You’ll want to be in the kitchen throughout the process to monitor the pressure, since if it gets too low, you’ll have to start the timer again. Many people worry about the pressure getting too high, having heard stories from the glory days of canning about devices exploding all over the kitchen. That’s not an issue with modern pressure canners, which come with a safety-release valve, and are very reliable if properly cleaned after use.
Aside from vegetables that canning turns to mush (including broccoli, brussels sprouts, cabbage, lettuce, cauliflower, and summer squash), pressure canning is great for just about any plant food—green beans, asparagus, carrots, beets, corn, you name it. It isn’t great for jams or pickles—their texture will suffer when canned at such high temperatures. The possibilities of pressure canning go beyond fruits and veggies, though, with lots of useful applications.
Try canning your own beans! Dry beans need to be soaked overnight for pressure canning (it also takes care of compounds that interfere with digestion). They’re then just partially cooked before being packed into jars, leaving some room for them to expand as they finish cooking in the canning pot. It’s a great (and cheap) way to have superior, ready-to-eat beans on hand in manageable quantities.
You can also pressure-cook meat. Some people are squeamish about it, but there are long traditions of canning chunks of beef or beef stew, fish stew, and tuna or salmon. Bone broths and soup stock also can well. Survivalists have even been known to pressure-can water! Unlike most home-canned goods, which remain safe but degrade in flavor and texture after a year or so, canned water will basically be good forever. Strange but true.
FERMENTATION
 Many people fear fermentation, but—at least with vegetables—it’s actually the safest and healthiest form of food preservation, and it’s easy! During fermentation, lactic acid bacteria and other microbes digest sugars present in all vegetables and fruits, naturally producing an acidic environment in which botulism toxins and other undesirable microorganisms can’t be found. In the process, rather than losing nutrients as happens in long, high-temperature cooking, these microorganisms make many vitamins and minerals more available to our bodies. It’s also likely—though studies are inconclusive—that the living microorganisms present in raw vegetable ferments support our own gut bacteria, which are crucial for a strong immune system.
You can ferment vegetables in just about any glass or ceramic container, or even food-grade plastic buckets. Metal jar lids can corrode from contact with ferments, but that problem can also be solved with some form of lining between the lid and the food in the jar.
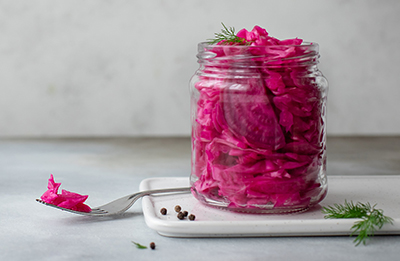
There are countless methods of fermenting veggies, but the two main ones could be called the “kraut method” and the “pickle method.” In the kraut method, vegetables with a relatively high water content (like cabbage, and also radishes and beets) are grated, salted, mixed, and squeezed, bruised or pounded to help release their juices. Usually they’re allowed to sit for anywhere from fifteen minutes to overnight, then massaged again before being packed into a fermentation vessel—tightly, to avoid leaving any air pockets—and sealed. The veggies then ferment for anywhere from a few days to up to a few years. Grated vegetables can also be mixed with sliced veggies, as long as everything is covered by the liquid brine when it’s gone into its vessel.
In the pickle method, sliced, diced, or small whole vegetables are put into fermentation vessels, then covered in salt water and sealed. It’s a good method for carrots, halved radishes, green beans, onions, asparagus and, of course, pickling cucumbers (though special methods apply to the latter two, which only ferment for a few days, and benefit from the addition of oak leaves, grape leaves, or other sources of natural tannins to help them stay crisp). Lacto-fermented fruits (especially firm berries) or unopened flower buds become intriguing, dynamic capers when treated in this way.
With either method, the fermentation itself usually happens easily, especially with organic produce (the fresher the better, but it will work with anything that’s not rotten). As fermentation progresses, the lactic acid bacteria will produce gases, which will need to be released from the vessel occasionally to avoid too much pressure buildup. If the ferment is bubbly and smells good (a somewhat subjective matter, but it’s good to trust your nose), it’s working, and the only potential danger is mold. That can be avoided in a number of ways. Various fermentation vessels let gas out without letting air in, preventing mold formation. Otherwise you can “burp” your ferments by loosening the lid and re-tightening it, in which case it’s also a good idea to stir a little, then press back down, since contact with the air can encourage mold.
Especially in hotter times of year, salt keeps ferments crisper, and sets up a less friendly environment for competing bacteria, before the ones we want take over. That said, you can push down the salt level if you like; it’s a matter of experimentation. Once the ferment is done to your liking, you can transfer it to a refrigerator, which will slow fermentation significantly—or let it continue to develop and taste it at different stages. Fermented foods will often keep for years, especially if they’re salty or spicy.
CAN DO!
Whatever methods you choose to explore, food preservation can be a fun, economical way to stretch the growing season. It can lend variety to your diet and your palate. A well-stocked pantry can be a beautiful thing to behold and can offer the satisfaction of having provided for yourself and those around you. With a few simple tools, the world of canning is open to you. Enjoy the bounty!


